Showing posts with label cake. Show all posts

Hot Chocolate Mug Cake

Am I bit mug-cake-crazy lately? That's a thing right? If Pinterest is any indication, then yes. Yes, it is. 

Can you blame me? I love my desserts that take a week to make, but some days you need cake STAT. 
So what is the mug cake du jour? It's hot chocolate mug cake! I found a way to make mug cakes even faster than before! I've cut out a whole ten seconds for measuring cocoa and sugar. You're welcome! 

This has everything. It's under five ingredients, less than a minute to make and microwavable. It's the trifecta!

I guess it could be gluten free, sugar free, or....well.... by that point it's pretty taste free. So let's just not, okay?
Part of the beauty here is you can use whatever flavor of hot chocolate mix you like! I've used vanilla, caramel and dark chocolate all with splendid results!

Now the question will come: What if my hot chocolate mix is in a can, not a packet? Well my dears, I'd say that's pretty easy. Whatever your can recommends for one cup of hot chocolate should be the equivalent.

Without further ado:

Hot Chocolate Mug Cake

1 packet hot chocolate mix
2 tablespoons flour
1 tablespoon water
1 tablespoon oil

Mix together and microwave 30 seconds, or until desired consistency.


Mug Cake


 With the Olympics drawing to a close my red, white and blue pride is showing! ....okay. Lame excuse. But any excuse for mug cake, right?


 I've tried a many a mug cake. I LOVE LOVE LOVE my mug brownies, but mug cakes never come out like cake.....or food. They always seem to be a gloppy mess. Not so with this recipe! Look at that mug cake! That's a proper cake!


 I couldn't help decorating with more sprinkles. Any excuse is a good excuse for mug cakes and sprinkles! I added a little cream cheese frosting for flair.

So. I know what you're thinking. SHUT UP AND GIMME SOME CAKE. Done.


The Mug Cake

3 tablespoons cake mix
2 tablespoons soda pop

Mix together and microwave for up to two minutes until fully cooked!

Want funfetti? Mix in some sprinkles! Be careful not to overmix!

Can be made with any mix and any soda for tons of fun flavors! The ones in this post were made with white cake mix and Sprite!

Enjoy!


Watercolor Cake


I have a love hate relationship with this cake. I love it. It's lovely. It's also the easiest, fastest cake I've ever decorated. That's the rub. I spend hours, and hours, on other gorgeous cakes and this one takes ten minutes and is just as lovely!

This is the cake for people who think they can't do cakes. If you can blob on frosting and kinda sorta smooth it down, this is your cake!...she said, throwing a wink and a nudge at her sister.

Step One:

Start out with a crumb coated cake. I was using the same buttercream frosting that I use for my old fashioned sugar cookies. There is no need to get particularly smooth on the frosting. When it's covered, set it in the fridge for about half an hour or more.

 Step Two:

Color your frosting. I made a light green, light purple, light blue, dark blue, pink, and yellow. For this particular cake you need more of the blues and greens, and very little of the purple, pink and yellow, but you can use any colors you want!

Blob on the frosting. Aren't you glad I'm being so specific? :) Blob away! For this cake I focused the darker colors at the bottom, lighter at the top. I only blobbed on the blues, green and purple to create a background.
Step Three: 

Smooth it out. Smooth as much or as little as you like. I preferred a little as it looked more like water that way. 

Step Four: 

Add some small pink blobs. Directly under them, add a wavy line of green and blob wavy blob of dark blue. This created the impression of a water lily, pad and shadowed water. 

I then slightly smoothed the green and blue. I wanted the colors the blend slightly into the background.

And as you'll see in the next picture, I piped on a tiny yellow dot on each flower to mimic the center or a waterlily or lotus. 


Voila! A finished waterlily/watercolor cake! If you want to check out some of my other cake tutorials, you can see them all right here!

Not a big fan of waterlilies? Prefer daisies? Do the background in dark green, light green, white, and yellow. Replace pink blobs with white or yellow daisies. Make shadows with dark green, blob on little bits of black for centers. Easy peasy. 

If you want a quick photo guide pin the photo collage below! You can skip reading all my "super specific" instructions. :) You don't need them! You can blob with the best of them! 

Enjoy! 


Raspberry Lemon Cake

Upsidedown cakes are among my favorites. They are lazy, but spectacular! What's not to love? Think I'm kidding? Take a peak at the others I've made: 
gorgeous apple upside down cake recipe from cherryteacakes.com
Apple Cider Upside down Cake
blackberry upside down cake recipe from cherryteacakes.com
Blackberry Upside Down Cake
red white and blue upside down cupcakes recipe from cherryteacakes.com
Red White & Blueberry
That's my kinda cake! The apple one is gorgeous! The blackberry is a personal favorite. And the blueberry upside down cake is just plain adorable! 

The raspberry lemon cake is one I've made in the past, but only now realized I never blogged! Whoops!

You can see how easy just from the pictures! That first picture? It's a sugar coated cake pan! If you've never tried this method you MUST. It's amazing!

Right? But it looks so impressive! And it tastes even better! The raspberries cook down into a delicious juicy jam. It's lovely. Although this recipe makes two eight-inch cakes, it can also be done as a sheet cake or cupcakes! 

I hope you enjoy this cake as much as I do!

Raspberry Lemon Upside Down Cake

1 lemon cake mix
1/3 cup oil
1 cup water
3 eggs
1/2 cup butter
2/3 cup sugar
2 pints raspberries
extra sugar for prepping pans

Preheat oven to 350.

Prepare the pans with a sugar coating.  Cover with cooking spray, then sprinkling sugar all around the sides and bottom of the pan.

Place half a stick of butter in each pan and place in the warming oven until melted.

Meanwhile, prepare the cake mix by mixing in the oil, water and eggs.

Remove pans from oven and sprinkle 1/3 cup sugar in each.

Spread raspberries across the bottom of the pan.

Divide the cake batter between the two pans.

Bake for 35-40 minutes, until a toothpick inserted comes out clean.

Allow to sit for 10 minutes before inverting.

Can be served warm or cold. I myself prefer warm with a scoop of vanilla ice cream!

Enjoy!

Muddy Buddy Cake

That beauty right there is eight layers of chocolate peanut butter goodness! There are two layers each of chocolate peanut butter mousse, chocolate cake, peanut butter cake, muddy buddy crunch and it's iced with the chocolate peanut butter mousse and topped with muddy buddies!

Now THAT is a cake! 
Look at those layers! INTENSE. The only criticism of the cake I have is that I went too thick on the middle muddy buddy crunch layer. Should have gone as thin as the bottom layer.
I'm particularly fond of the elegance of the top of the cake. A quick swirl and a muddy buddy really make for a good border. Just enough of an accent without going overboard. Once you cut into the cake all the focus goes there and that's just the way it should be! 
While you can make this all in one day, it can be done over a few days as well. With so many  moving parts split it up! Bake and make muddy buddies one day, stack and ice the next! You'll be happy you did! 

Muddy Buddy Cake 

1 chocolate cake mix (plus eggs, oil, etc. as the box recommends)
1 butter cake mix (plus eggs, oil, etc. as the box recommends)
1/2 cup peanut butter 

1 cup simple syrup

8 cups Muddy Buddies, plus more for garnish
1/2 cup unsalted butter, melted

1 1/2 cup unsalted butter, room temperature
2 1/4 cup powdered sugar
6 ounces semi sweet chocolate chips, melted and cooled
3/4 cup peanut butter

Bake two 8 inch round chocolate cakes, according to the mix instructions. 

Make two 8 inch butter cakes according to the mix instructions. Add in peanut butter when you add the butter. 

Allow cakes to cool before leveling. 

Line two 8 inch cake pans with parchment paper. Put 8 cups of muddy buddies into a food processor and grind into crumbs. Turn out into bowl and add melted butter. stir until the crumbs are well moistened. Pat the mixture firmly and evenly into the bottom of two 8 inch cake pans.  Put in freezer for one hour.

Cream butter in a mixing bowl. Gradually beat in the sugar with an electric mixer until light colored and well blended. Beat in the thoroughly cooled chocolate, and peanut butter, until you reach a uniform consistency. Be sure to scrape down the sides.

To assemble the cake, place on layer of the muddy buddy crunch down first. 

Place a leveled layer of peanut butter cake down next. Brush the top of the cake with simple syrup.

Pipe of layer of the chocolate peanut butter mousse on top, then gently place a layer of the chocolate cake on top. Brush the top of the cake with simple syrup. 

Repeat with the remaining layers. 

Ice cake with the mousse. To get very smooth frosting, dip your knife in hot water occasionally. The heat will help the icing smooth. 

Pipe swirls on cake, placing a muddy buddy in between each swirl. 

Pipe a border along the bottom of the cake. 

Store in the fridge. Take the cake out of the fridge 15 minutes before serving. 

Et voila! You have a lovely cake full of deliciousness!

Rum Cake


Recently I posted on Facebook a link to an Epicurious article on crunchy cake crusts. The gist: use sugar to line a cake pan instead of flour. It works! 

In general using sugar to line a cake pan is best for only a few types of cakes. Realistically it is best for they cakes you don't frost: upsidedown, bundt, loaf, but especially rum cake. 

It gives the cake the BEST crust ever. The crunchy texture pairs especially well with the moist cake. 


I also use powdered sugar for all the other cakes. Works the same as flour, but I prefer it. Sometimes flour leaves a grainy texture on the outside of a cake, but powdered sugar never does. It's brilliant!


Today I tried out a new recipe. I liked the simplicity of it and wanted to see how it'd work out. Turns out great!

If you want a rumless rum cake replace the half cup of rum with a cup of water and 2 tablespoons rum flavoring. Enjoy!

Rum Cake
as adapted from King Arthur Flour

for the cake
2 cups All-Purpose Flour
1 1/2 cups sugar + extra for lining the cake pan
1/2 cup unsalted butter, softened
1/2 cup instant vanilla pudding mix, dry
2 teaspoons baking powder
1 teaspoon salt
1/2 cup vegetable oil
1/2 cup milk
4 large eggs
1/2 cup golden rum
2 teaspoons vanilla

for the syrup
1/2 cup unsalted butter
1/4 cup water
1 cup sugar
1/2 cup golden rum
1/2 teaspoon vanilla


Preheat oven to 325°F. Spritz a 10 to 12 cup bundt pan with cooking spray. Sprinkle in some sugar and turn the pan to coat evenly. Set aside.

Place all of the dry cake ingredients into the stand mixer. Mix lightly just to incorporate. Add the liquid ingredients, except the rum and vanilla, in the bowl of your stand mixer and blend on medium speed for 2 minutes. Scrape down one or twice during those two minutes.

Add the rum and vanilla to the batter and blend for another minute. Pour the batter into the prepared bundt pan and spread level with a spatula.

Bake the cake for 50 to 60 minutes. When done, the cake will test clean on a cake tester. If you don't have one, I have used metal chopsticks and butter knifes in the past. King Arthur also recommends a piece of dry spaghetti.

Leave the cake in the pan to cool slightly while you make the soaking syrup.

In a medium-sized saucepan combine the syrup ingredients, except vanilla. Bring to a rapid boil then reduce to a simmer and cook for about 5 to 8 minutes, until the syrup thickens slightly. Remove from the heat and stir in the vanilla.

Use a long skewer to poke holes all over the cake. Pour about 1/4 of the syrup over the cake (still in the pan). I like to make sure it dribbles around the sides as well. Allow the syrup to soak in, then repeat again and again until all the syrup is used. I typically wait about half an hour in between additions.

Cover the pan loosely with plastic wrap and allow the cake to sit out overnight to cool completely and soak in the syrup.

When ready to serve, invert on to your serving plate. The crunchy crust will ensure no sticking!

Enjoy!

Make That Cake: Petal Cake


Miracles. Do. Happen. 

There is a woman out there who has agreed to marry one of my high school best friends! And she wasn't even tricked into saying yes!

I absolutely adore her and all her wedding plans. Garden party wedding with tons of pink and green and gold? Um. It's THE dream. I could geek out about her wedding all day long. Okay. I have. Often. Daily. Fine! I admit it! I created a pinterest board for their wedding! I just love garden parties! So sue me! 

Luckily, I get to make their wedding cake! So I have a few months of practice cakes ahead of me! Garden party for one! 

And what's a garden party without a petal cake? Lame. That's what. 

I'm excited for this post for another reason. I've been wanting to try this for a long time! Introducing my first ever stop motion cake video!

I've been watching it all. day. long. I need help. 


Got the idea now?

Good! Need more? No Problem! Here's my super technical list of steps:
  1. Frost a cake and get smooth edges around the sides. (Tip! Dipping your knife in hot water will heat the blade and help your frosting smooth more easily!) 
  2. Pipe a bunch of blobs of icing (I used buttercream) all around the edge of the cake.
  3. Using a spoon, spatula, cake decorating thingy-magigger, press down on the blob and pull into the middle of the cake. 
  4. Repeat for all blobs. 
  5. Make another circle of blobs an inch or two in from the previous row. 
  6. Repeat. Over and over again. Once there is no more room, add a few tiny yellow blobs to fill in the middle. 
  7. Put tiny blobs all around the bottom.  
This is a very simple cake that is very quick to decorate and looks very impressive. It's a perfect beginners cake!

Don't have a piping bag? You can use a gallon size zip lock bag! You don't even need any piping tips. Cut a bit off the corner (just under half an inch) and get to blobbing! For the bottom edging, grab another bag and this time only cut off a tiny bit (less than a quarter of an inch).

Don't have a zip lock bag? You can scoop half tablespoons of buttercream on the cake instead of piping on a blob. It'll take longer, but in a pinch it'll work! Just don't attempt the tiny blobs around the bottom and leave that plain.

Done and done.

Happy decorating!

Chocolate Praline Cake


Saturday, I made pralines... of shame. 

You may take away my southern girl card now. I over stirred. I am ashamed. Feel free to clutch your pearls, and bless my heart. It's been so long since I've made a praline and I just got carried away. 

Happily, this is going to be a thing of the past. Starting in 2016, this will be my full time gig. No more day job! No more going months without make pralines...or anything for that matter.  I will bake with wild abandon... and start running so I can also eat with wild abandon! 

The failed pralines started a chain reaction. I didn't want to throw them away, but how to use them? 

When in doubt... or moments of insanity... I chuck my failures in the food processor. It's cathartic to grind my failures in dust, and even better when I sprinkle them over ice cream. Say what you will, but I like how I deal with failure. It's tasty. 

Fact is, ground pralines are a perfect addition to almost any baked good. Throw half a cup in your next cookie batch and you'll see what I mean! They are excellent decorations as well, as you can see on the cake above!

I winged this cake, big time, and it turned out wonderfully. It feels so good to be getting back to the career I enjoy! 

Three cheers to cake, career changes and chocolate praline cake! 

Chocolate Praline Cake

1 recipe pralines, ground  *** 

for the cake:
1 1/2 cups butter
3 cups sugar
5 eggs
2 tsp. vanilla extract
1 cup milk
2 cups flour
3/4 cup dutch cocoa
1/2 tsp. baking powder
1 tsp. kosher salt 

for the bottom layer
1/2 cup rice krispy cereal
1/2 cup melted chocolate
1/2 cup crisped cake crumbs
1/2 ground praline

for the praline layer
2 cups ground praline
2 tablespoons butter, melted

for the chocolate buttercream 
1/2 cups butter, at room temperature
1 1/3 cups powdered sugar
1/4 cup cocoa powder
1-2 tablespoons heavy whipping cream
1 teaspoon vanilla extract
pinch table salt

additional ground pralines for garnish


Preheat oven to 325 degrees F (165 degrees C). Grease and flour a jelly roll or sheetcake pan. Mix together the flour, cocoa, baking powder, and salt. Set aside

In a large bowl, cream together the butter and sugar until light and fluffy. Beat in the eggs one at a time, then stir in the vanilla. Beat in the flour mixture alternately with the milk. Pour batter into prepared pan.

Bake in the preheated oven for 20 - 30 minutes, or until a toothpick inserted into the center of the cake comes out clean. Let cool in pan for 20 minutes, then turn out onto a wire rack and cool completely.

Meanwhile, make the pralines and set aside.

Cut out two 8 inch rounds from  your sheet cake. I used my 8 inch springform pan as a "cookie cutter" for this. 

Crumble excess cake and spread out on a baking sheet. Return to oven for 15-20 minutes until crumbs are dried and crisp. 

Grind the pralines in a food processor. The end result will look and feel like very soft light brown sugar. 

Line the bottom of an 8 inch spring form pan with parchment paper. Mix together all ingredients for the bottom layer of the cake in a large bowl. Press into the bottom of an 8 inch spring form pan. 

Top with a layer of cake. 

Mix together both ingredients for the praline layer in a large bowl. Pour over top of cake layer and gently press into an even layer. 

Top with second layer of cake. 

Refrigerate for one hour. 

Meanwhile, make the buttercream. 

In a the bowl of an electric stand mixer, fitted with whisk attachment whisk butter and sugar on medium-high speed until very pale and fluffy or about five minutes.
With the mixer off, Scrape the bowl, then add in cocoa powder, vanilla and salt. Turn mixer on low and blend for about 30 seconds. Add in heavy cream.

Scrape down the sides of the bowl then turn the mixer onto medium-high and whisk for 3-5 minutes or until mixture is lighter and fluffier. 

Remove cake from the refrigerator, out of spring form pan and remove the parchment paper from the bottom of the cake. Take out a large baking pan and set a can of soup inside. 

Proceed to ice the cake with buttercream frosting.

Place cake on top of can of soup and press ground pralines onto the side of the cake, allowing the excess to fall into the baking sheet. 

Plate and enjoy! 


*** Just note, this recipe doesn't call for stirring at the end, but you should stir just a bit. There will be a moment when you feel the pan get heavier. Stop then and spoon 

Make That Cake: Gilded Lily

Make That Cake Tutorial from Cherryteacakes.com


Make That Cake Tutorial from Cherryteacakes.com
I have been absentee. I apologize. I took some time off of baking to lose 25 pounds. I'm getting married in a few months and... well... there are side effects of baking! Namely, effecting the size of my sides. Yeesh.  But I've come up with a compromise!

That cake is a dummy cake. It's a very nice 6x8 inch round piece of styrofoam. It takes the edge of my baking needs, but I'm not desperate enough to eat it. Talk to me after another 10 pounds and I might be singing a different tune!

Recently I made a friend's wedding cake. There was no reason whatsoever for her to pay $800 for a three tier cake when I could make it for $100. Baking skills can save you a lot of money. So can having a wedding cake that is mostly styrofoam. Her cake had two layers of styrofoam and one layer of real cake. She still cut her cake, it looked amazing, nobody knew the difference but it saved hours of baking, and a lot of supplies. Those layers of cake each cost $3. Consider it.

This is the first in a series I'm calling Make That Cake. This cake is a small one tier beauty. I'll be making cakes in all shapes and sizes and pieces of styrofoam. Again, I'm getting married people. I need to not be near cake for a while. 

This is probably the simplest of the cakes I'll be doing. It is elegant, simple, modern, and lovely. If you repeated this design over two or three or more tiers, you'd have an amazing wedding cake.

DISCLAIMER: This tutorial is about spray painting an edible golden stripe onto your cake. This DIY is starting with a fondant covered cake.Covering a cake with fondant is a tutorial all it's own. If you don't know how to cover a cake with fondant, then use this video to crumb coat your cake and then this Martha Stewart video will teach you to cover that cake with fondant. I'm also starting with a pre-made calla lily. That, again, is it's own tutorial (not to mention a big hassle to make. I highly recommend buying them).


Make That Cake: Gilded Lily


Supplies: 


Instructions


  1. Cover the cake with fondant. 
  2. Prepare a large area by covering with newspaper or additional parchment paper. 
  3. Wrap a large piece of parchment paper around the cake (make sure a straight edge is along the bottom)
  4. Ensure that the wrap is straight with about 1 inch of the bottom of the cake exposed. 
  5. Pin the parchment paper in place, or tape it. I use pins that stick into the cake so the parchment cannot slide. 
  6. Place cake in the middle of your prepared painting area. 
  7. Spray the exposed area with gold edible food spray. Also spray your gum-paste lily. 
  8. Allow to set for half an hour to dry. 
  9. Remove the parchment paper. 
  10. Transfer the cake to a cake stand. 
  11. Adorn with a your golden lily.


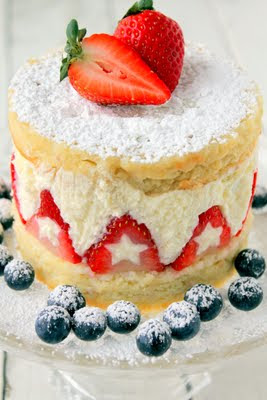
Fraisier

fraisier recipe from cherryteacakes.com
Fraisier recipe from cherryteacakes.com
This month I was lucky enough to be the Daring Bakers hostess for the challenge! As the host, it's a tad bit awkward to include the blog checking lines in a graceful way......so, as I have no grace I'll aim for my usual forwardness:
Jana of Cherry Tea Cakes was our July Daring Bakers’ host and she challenges us to make Fresh Frasiers inspired by recipes written by Elisabeth M. Prueitt and Chad Robertson in the beautiful cookbook Tartine.
If you've ever eaten at Tartine, seen their bread book or bakery book, you know full well why I would challenge everyone to their recipes! It is one of the best bakeries I have been to in the U.S. I was recently in San Francisco and actually got to pay a little visit to the shop after a long line that wrapped around the block that is! If you go, the two things you must absolutely try are the almond rochers and the banana cream tart. I know, banana cream tarts are "blah" when you think about it, but trust me when I say that it will blow your mind. Just last night Butchie returned from San Francisco with a box of their treats for me, and that rocher lasted all of ten seconds in my care. I don't know how they do it, but they do it well!

It's been so fun, and at times, nail biting to watch bloggers posting their completed masterpieces in our private viewing gallery. For some people the cream never set, for others the cake failed, but for most the recipe worked out splendidly. The more I make the chiffon cake recipe, the better I get at it and realize that what I thought was a great cake, gets even better.

I love creativity so when thinking up the rules I gave the bloggers a pretty liberal set of rules, allowing them to use their own flavor combinations. Though, as a side note: It is only truly a fraisier if there are strawberries. This is not negotiable. Our cakes kept in the spirit of the fraisiers even when not a true fraisier. But who could resist throwing in a few blueberries?
Some of my favorites were made by (from left to right): an adorable classic fraisier by  tarte pink, a double layer by you made that?, a grape-ier by taste of youth, mini fraisiers by my kitchen treasures, peach and blueberry-ier by the great cake company and a cherry-ier by brilhante glacear.

I'm so so so excited by how amazing everyone's cakes have turned out. Though the challenge was time consuming, I'm hoping that everyone enjoyed the process and was as enthused by the result as I was! If you have the time and inclination, try it out for yourself! It's a challenge, but the result is well worth the effort!

A mighty thanks to everyone who participated this month! Cheers!

Basic Chiffon Cake

1 cup + 2 tablespoons (270 ml) (5½ oz/155 gm) all-purpose flour
1 teaspoon (5 ml) (4 gm) baking powder
3/4 cups (180 ml) (6 oz /170 gm) sugar
1/2 teaspoon (2½ ml) (1½ gm) salt, preferably kosher
1/4 cup (2 fl oz/60 ml) vegetable oil
3 large egg yolks
⅓ cup + 1 tablespoon (3.17 fl oz/95 ml) water
1 teaspoon (5 ml) pure vanilla extract
3/4 teaspoon (3¾ ml) (3 gm) lemon zest, grated
5 large egg whites
¼ teaspoon (1¼ ml) (1 gm) cream of tartar

  1. Preheat the oven to moderate 325°F (160°C/gas mark 3).
  2. Line the bottom of an 8-inch (20 cm) spring form pan with parchment paper. Do not grease the sides of the pan. (some found it better to split the cake batter between two 8 inch pans. to each their own) 
  3. In a large mixing bowl, stir together the flour and baking powder. Add in all but 3 tablespoons (45 ml.) of sugar, and all of the salt. Stir to combine.
  4. In a small bowl combine the oil, egg yolks, water, vanilla and lemon zest. Whisk thoroughly.
  5. Combine with the dry ingredients and mix thoroughly for about one minute, or until very smooth.
  6. Put the egg whites into a stand mixer, and beat on medium speed using a whisk attachment on a medium speed, until frothy. Add cream of tartar and beat on a medium speed until the whites hold soft peaks. Slowly add the remaining sugar and beat on a medium-high speed until the whites hold firm and form shiny peaks.
  7. Using a grease free rubber spatula, scoop about ⅓ of the whites into the yolk mixture and fold in gently. Gently fold in the remaining whites just until combined.
  8. Pour the batter into the prepared pan. Bake for 45 to 55 minutes or until toothpick inserted into the center comes out clean.
  9. Removed the cake from the oven and allow to cool in the pan on a wire rack.
  10. To unmold, run a knife around the sides to loosen the cake from the pan and remove the spring form sides. Invert the cake and peel off the parchment paper. Refrigerate for up to four days.

Variations to the Basic Chiffon Cake:

Lemon Chiffon Cake

Ingredient Alterations:
Reduce water to 1/4 cup (60 ml)
Add 1/8 cup (30 ml) lemon juice
Increase lemon zest to 1½ teaspoon (7½ ml) (5 gm)
Remove the vanilla from the recipe

Direction Alterations:
Follow the directions, same as above, adding the lemon juice and zest to the oil, egg yolks and water in step 4.

Orange Chiffon Cake

Ingredient Alterations:
Replace the full amount of water with orange juice
Replace lemon zest with the zest of one orange
Remove the vanilla from the recipe

Direction Alterations:
Follow the directions, same as above, adding the orange juice and zest to the oil, and egg yolks in step 4.

Coconut Chiffon Cake

Ingredient Alterations:
Add ¼ teaspoon (1¼ ml) (1 gm) freshly ground nutmeg
Reduce oil to 1/8 cup (1 fl oz/30ml)
Reduce water to 1/8 cup (1 fl oz/30ml)
Add 1/3 cup (2 ⅔fl oz/80 ml) unsweetened coconut milk
Remove the vanilla from the recipe

Direction Alterations:
Follow the directions, same as above, adding the nutmeg to the flour mixture in step 3, and the coconut milk to the oil, water and egg yolks in step 4.

Chocolate Chiffon Cake

Ingredient Alterations:
Reduce all-purpose flour to ¾ cup + 1 tablespoon (195 ml) (4 oz/110 g)
Add 1/4 cup (60 ml) (3/4 oz/20 g) cocoa powder

Direction Alterations:
Follow the directions, same as above, adding the cocoa to the flour mixture in step 3.

Pastry Cream Filling:
Fraisier recipe from cherryteacakes.com

1 cup (8 fl oz/250 ml) whole milk
1/2 teaspoon (2½ ml) pure vanilla extract
1/8 teaspoon (1/2 ml) (¼ gm) salt, preferably kosher
2 tablespoons (30 ml) (10 gm)cornstarch
1/4 cup (60 ml) (2 oz/55 gm) sugar
1 large egg
2 tablespoons (30 ml) (1 oz/30 gm) unsalted butter
3/4 teaspoon (3¾ ml) (4 gm) gelatin
1/2 tablespoon (7½ ml) water
1 cup (8 fl oz/250 ml) heavy cream

  1. Pour the milk, vanilla, and salt into a heavy sauce pan. Place over medium-high heat and scald, bringing it to a near boiling point. Stir occasionally.
  2. Meanwhile, in a stand mixer add the cornstarch and sugar. Whisk to combine
  3. Add the eggs to the sugar and cornstarch and whisk until smooth.
  4. When the milk is ready, gently and slowly while the stand mixer is whisking, pour the heated milk down the side of the bowl into the egg mixture.
  5. Pour the mixture back into the warm pot and continue to cook over a medium heat until the custard is thick, just about to boil and coats the back of a spoon.
  6. Remove from heat and pass through a fine mesh sieve into a large mixing bowl. Allow to cool for ten minutes stirring occasionally.
  7. Cut the butter into four pieces and whisk into the pastry cream a piece at a time until smooth.
  8. Cover the cream with plastic wrap, pressing the plastic wrap onto the top of the cream to prevent a skin from forming. Chill in the refrigerator for up to five days.
  9. In a small dish, sprinkle the gelatin over the water and let stand for a few minutes to soften.
  10. Put two inches (55 mm) of water into a small sauce pan and bring to a simmer over a medium heat.
  11. Measure 1/4 cup (2 oz/60 ml) of the chilled pastry cream into a small stainless steel bowl that will sit across the sauce pan with the simmering water, without touching the water.
  12. Heat the cream until it is 120 F (48.8 °C). Add the gelatin and whisk until smooth. Remove from the water bath, and whisk the remaining cold pastry cream in to incorporate in two batches.
  13. In a stand mixer, fitted with the whisk attachment, whip the cream until it holds medium-stiff peaks. Immediately fold the whipped cream into the pastry cream with a rubber spatula.

Simple Syrup:

You may choose to flavor the syrup. One way is to use flavored sugar (for example: apple cider sugar,orange sugar, or vanilla sugar) or to stir in 1-2 teaspoons of flavored extract. You may also infuse with herbs or spices, if desired or add four tablespoons (60 ml) of fruit juice or liqueur while the syrup is cooling.

1/3 cup (2⅔ fl oz/80 ml) (2⅔ oz/75 gm) of sugar, flavored or white
1/3 cup (2⅔ fl oz/80 ml) of water


  1. Combine the water and sugar in a medium saucepan.
  2. Bring the mixture to a boil and let the sugar dissolve. Stirring is not necessary, but will not harm the syrup.
  3. Remove the syrup from the heat and cool slightly.
  4. Transfer syrup to a lidded container or jar that can be stored in the refrigerator. Simple syrup can be stored for up to one month.

Fraisier Assembly:

1 baked 8 inch (20 cm) chiffon cake
1 recipe pastry cream filling
⅓ cup (80 ml) simple syrup or flavored syrup
2 lbs (900 g) strawberries
confectioners’ sugar for dusting
½ cup (120 ml) (5 oz/140 gm) almond paste

  1. Line the sides of a 8-inch (20 cm) spring form pan with plastic wrap. Do not line the bottom of the pan.
  2. Cut the cake in half horizontally to form two layers.
  3. Fit the bottom layer into the prepared spring form pan. Moisten the layer evenly with the simple syrup. When the cake has absorbed enough syrup to resemble a squishy sponge, you have enough.
  4. Hull and slice in half enough strawberries to arrange around the sides of the cake pan. Place the cut side of the strawberry against the sides of the pan, point side up forming a ring.
  5. Pipe cream in-between strawberries and a thin layer across the top of the cake.
  6. Hull and quarter your remaining strawberries and place them in the middle of the cake. Cover the strawberries and entirely with the all but 1 tbsp. (15 ml) of the pastry cream.
  7. Place the second cake layer on top and moisten with the simple syrup.
  8. Lightly dust a work surface with confectioners' sugar and roll out the almond paste to a 10-inch (25 cm) round 1/16 inch (1.5 mm) thick. Spread the remaining 1 tablespoon (15 ml) of pastry cream on the top of the cake and cover with the round of almond paste.
  9. Cover with plastic wrap and refrigerate for at least 4 hours.
  10. To serve release the sides of the spring form pan and peel away the plastic wrap.
  11. Serve immediately or store in the refrigerator for up to 3 days.


Chocolate Chiffon Cake

chocolate chiffon cake recipe from cherryteacakes.com
So this last weekend we threw a birthday party for dear Butchie. She wanted a chill night on my awesome porch, good friends and food and one fancy cake. She used expletives to express her fervor towards the fanciness of the cake.......and by the time I was done making the darn thing I was too. She described the cake as "infused with curse words." Before you get on your high horse and judge me, let me give you a time line: Thursday night baking, Friday morning baking, Friday night pudding cooking, and ALL Saturday on construction. By that point wouldn't you be infusing with swear words? That was twenty hours on a cake! Every free moment I had for three days! KILLER.

magpies cake
So this cake was an attempt at a do it yourself  replication of a magpies cake I've seen and loved. Now........my cake is just not that good in comparison. How on earth they made those amazingly thin and delicate looking layers is beyond me. You can see where the theme held threw even if the technique was lacking.,,, but how? How? HOW did they do it?!? I'm going to try again in the near future, this time with chocolate instead of fondant, and also, on a cake that does not have three massive cream filled layers, and that has time to let the crumb coating set into a very hard shell for structural support. Also....better lighting. Trying to take a photo as the sun was setting....not so hot.

Butchie's cake was chocolate, filled with butterscotch, wrapped in a buttercream crumb coat, and layered in thin sheets of fondant...as thin as I could go and it still wasn't thin enough! I tried to texture the little sheets by pressing paintbrushes into them.......didn't hold. I tried to make the layers pull out from the cake........then the humidity hit and the cake drew it's inspiration from the wicked witch of the west....melting, melting, melting and infused with curses. So..........what I really think everyone should take away from this cake is the chocolate cake recipe. It's a beautiful chiffon cake, smooth, with good flavor. It stays moist and airy, and lately is my go to chocolate cake recipe.

Enjoy! and another happy birthday to Butchie!

Chocolate Chiffon Cake
adapted from Tartine


¾ cup all-purpose flour
¼ cup dutch cocoa powder
1 teaspoon baking powder
3/4 teaspoon powdered lemon zest
3/4 cups sugar
1/2 teaspoon kosher salt
1/4 cup vegetable oil
3 large egg yolks
⅓ cup water
1 teaspoon pure vanilla extract

5 large egg whites
¼ teaspoon cream of tartar

Preheat the oven to moderate 325°F (160°C/gas mark 3).

Line the bottom of an 8-inch (20 cm) spring form pan with parchment paper. Do not grease the sides of the pan.

In a large mixing bowl, stir together the flour and baking powder. Add in all but 3 tablespoons (45 ml.) of sugar, powdered lemon peel and all of the salt. Stir to combine.

In a small bowl combine the oil, egg yolks, water, and vanilla. Whisk thoroughly.

Combine with the dry ingredients and mix thoroughly for about one minute, or until very smooth.

Put the egg whites into a stand mixer, and beat on medium speed using a whisk attachment on a medium speed, until frothy. Add cream of tartar and beat on a medium speed until the whites hold soft peaks. Slowly add the remaining sugar and beat on a medium-high speed until the whites hold firm and form shiny peaks.

Using a grease free rubber spatula, scoop about ⅓ of the whites into the yolk mixture and fold in gently. Gently fold in the remaining whites just until combined.

Pour the batter into the prepared pan. Bake for 45 to 55 minutes or until toothpick inserted into the center comes out clean.

Removed the cake from the oven and allow to cool in the pan on a wire rack.

To unmold, run a knife around the sides to loosen the cake from the pan and remove the spring form sides. Invert the cake and peel off the parchment paper. Refrigerate for up to four days.

Apple Butter Cinnamon Coffee Cake

A no fat and full flavor Apple Butter Cinnamon Coffee Cake, made be replacing fat with homemade apple butter, complete with a streusell and cinnamon chip topping. 
 Apple Butter Cinnamon Coffee Cake recipe from cherryteacakes.com
I may have replaced oil for apple butter, but i'm not going to try to tell you this is healthy. Not healthy, just healthier. Funny how that works, and more funny how this cake baked. I made a little bit of an error in judgement Saturday morning. I needed a 9-inch pan. So I grabbed one. I grabbed the one that was pretty, white, shallow, etc. (I'm not sure if I just described a cake pan or my high school cheer squad...) Anyway...the pan was a wee bit too shallow for that much batter. Wee bit? A lot bit. If I were smart I would have poured half the batter into an 8-inch pan...remember how I said this was Saturday morning? I don't have much common sense when I wake up. So instead I had a cake that was overflowing....a lot. constantly. with no end in sight. I have now resolved to wait to bake in the morning. I also resolved to sit back with popcorn and watch the fireworks in my oven. Good times.

Other than my slight baking mishap, the cake is flavorful, moist and much better when you bake it properly in pans that actually fit the cake. Go figure.

Apple Butter Cinnamon Coffee Cake

2 1/2 cups flour
1 cup brown sugar, packed
3/4 cup granulated sugar
1/2 tablespoon ground cinnamon
3/4 cup apple butter
1 teaspoon baking powder
1 teaspoon baking soda
1 egg
1 cup buttermilk
1 cup cinnamon chips or nuts

Heat oven to 325. Grease and flour a 10" round cake pan. Combine the flour, sugars, cinnamon and apple butter in a stand mixer. Mix on low until a pebbly sandy texture is achieved.

Measure out 3/4 cup and set aside. In a small bowl combine baking powder, baking soda, egg and buttermilk. Let stand 5 minutes. The mixture should double in size and be a bit bubbly. Blend it into the flour mixture.

Pour the batter into the cake pan. Mix the cinnamon chips with the reserved 3/4 cup topping and sprinkle over the top. Bake the cake for about 45 minutes, or until a toothpick inserted in the center comes out clean. Allow to cool ten minutes before serving.

Chocolate Buttermilk Cake Donuts

Dark chocolate buttermilk donuts with a chocolate glaze, moist and mouthwatering. 
(special thanks to Brandon for buying me a tripod so I could taker primp-ier photos)
I've had a "busy" day off. Busy enjoying GOOD food.

The last two weeks around here have been CRAZY. Between wedding catering, my birthday, conferences, and a work week I don't care to discuss anymore I. Am. Fried. I have next to nothing left to give. So, this weekend is my weekend off. Aparently, however, not off from blogging or baking. But that's just because this is what I actually enjoy out of all of this busy work.

Step one on the weekend off was shopping. I headed down to my "happy place" and did some cooking supply shopping.....I went in for a donut cutter for raised donuts. A purchase that should have only been four dollars total....fifty dollars and a few impulse purchases later, I also had cake donut pans, cannoli molds, and a few more porcelain dishes. So, of course that meant step two was breaking it all in.

And so this morning I made some chocolate buttermilk cake donuts before heading off to Taste of Georgetown.  So, basically, in the past four hours, I've eaten my caloric intake for the next week...and a half.....and it was worth it.

Clockwise: Farmers & Fishers Long Roasted Pork Taco, Patisserie Poupon Macarons, Filomena Pumpkin Cheesecake,  Tony & Joe's Macademia Crusted Shrimp,  Patisserie Poupon Pear Tart, J. Paul's Crab Cake and Cheeseburger Sliders, Chadwicks Baby Back Ribs, and the stilt walking ticket man. 
I think the photos speak for themselves. I quite literally will not be needing to eat for a week (and yet I am polishing off the macarons as I write this post). But WOW was it crowded! Long lines for good food is not surprise to me, luckily there were three of us. We could split tickets and lines and make it through in no time.....okay, so maybe Marie and I made it through about three lines before Hugh was able to get to the front of the Farmers & Fishers line....but, hey, we got our food and life was good. No. Life. Was. Great. My personal favorites were the macarons, and the ribs. I highly recommend Filomena (get the cannelloni frutti di mare) and would like to tell Farmers & Fishers that they had one of the worst corn tortillas I have ever had. Sad day. It was the only disappointment. The tacos did not deliver. But hey, only one less than stellar dish? Not too shabby.

So now I'm home. Back from a fun day and continuing to polish off the chocolate donuts relax and enjoy a lovely Saturday in DC.


Chocolate Buttermilk Cake Donuts

1 1/2 cups cake flour
1/2 cup dutch process cocoa
3/4 cup sugar
2 tsp. baking powder
1 tsp. kosher salt
3/4 cup buttermilk
2 eggs
2 T. butter, melted
1 tsp. vanilla

Preheat oven to 425. Spray donut pan with cooking spray.

In a large bowl (or stand mixer), soft together flour, cocoa, sugar, baking powder, and salt. Add buttermilk. Stir. Add butter and vanilla. Stir.  Add eggs one at a time, stirring in between each egg. Beat until just combined. Fill each donut mold about 2/3 full.

Bake for roughly seven minutes, or until a toothpick inserted comes out clean. Allow to cool, and decorate accordingly. I dipped mine in chocolate glaze and sprinkles.


Satiny Chocolate Glaze

3/4 cup semisweet chocoalte chips
3 tablespoons butter
1 tablespoon light corn syrup
1/4 teaspoon vanilla extract

In a bowl combine chocolate chips, butter and corn syrup. Microwave in 30 second increments, stirring between each time until smooth. Do not overcook.

Chocolate Collars

Chocolate collars going around the outside of a cake are simply one of the fastest and easiest ways to take a cake from ordinary to fabulous! Got five minutes, chocolate and wax paper? You're good to go. 
Happy birthday to me!

Yes, this beautiful  cake was my birthday cake on Sunday! My own personal cake that is. I made a second cake for everyone else. It's my birthday. I don't want to share my cake on my birthday. Ha ha. You might judge me for it, but deep down, you know you really want to do the same. Besides it's not like I didn't let them have any cake! I made a four layer chocolate hazelnut cake for the party! And pumpkin pies!

My good friend, Rachel, and I had a disagreement  conversation about whether or not it was okay for me to make my own birthday cake. I had to point out a few things (like how much I love making cake, and that making a pretty cake is just "what I do" with my free time) before she'd let me.

My mother gave me some new toys kitchen accessories that I have been really excited to try out: baking rings! I love stacked desserts and finally had some rings of my own to use! I am such a dork dweeb baking enthusiast! I was also pretty excited to try out making a chocolate collar, which as it turns out is super easy....just don't try to fiddle with it too much AFTER you put it on the cake. Don't believe me? See the fingerprints on the cake below? Yep. Just don't.
top: close up of chocolate collar and berries bottom: uncovered cake and chocolate hazelnut cake

Making the chocolate band is super easy!  My recommendation is keeping the chocolate decently thick, so then when it hardens fully, it won't break. :) For my birthday cake I cut a strip of wax paper that goes around the cake, andmade the band extra tall, melted some chocolate, smoothed it on, and then refrigerated for five minutes....CAREFULLY picked it up, wrapped it around and then crinkled in the chocolate. I loved the effect but getting the wax paper pulled off after it set was a tad bit tricker. 

Here's the video I used from Bonappetit.com as my guide! Good luck and have fun!